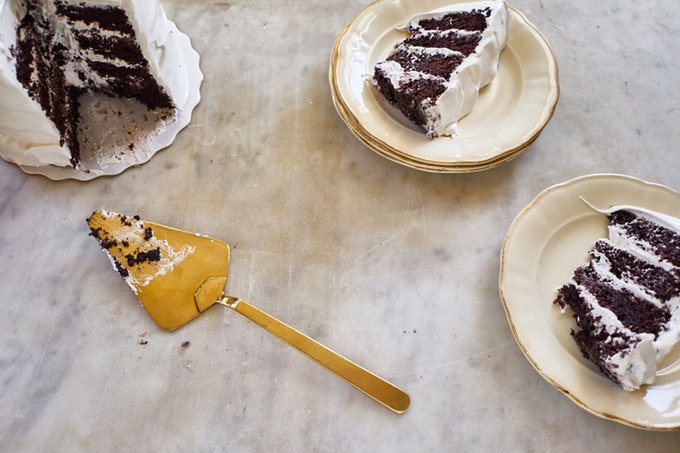
What you see here is Violet Bakery Chocolate Devil’s Food Cake. The chocolate factor is deep and strong. The cake itself is rich, moist, and tender. It’s exactly what you want when you’re craving a homemade chocolate cake – an ace in that regard.

I love a beautiful, frosted, homemade cake like no one else, but only bake them now-and-then. Because, cake. If it’s there, I want to eat it. All of it. More often than not, I throw together quick and easy loaf cakes (like this, this, and this) and call it a day.
But, because I brought back a beautiful brass cake server from Simon Marks in Jaipur, and because my birthday was just around the corner, and because Claire Ptak’s Violet Bakery Cookbook was winking at me, I pulled my favorite mixing bowl from the shelf, and checked to see if I had enough buttermilk. This cake was meant to be, I had all the ingredients on hand, and shy of the buttermilk, you probably do too.
The frosting is Claire’s Marshmallow Icing, it’s also in the same beautiful book. It’s billowy, sweet, vanilla-flecked, and a compelling alternative to buttercream. You’ll want to put it on the cake, and everything else edible in your life. I found myself dipping berries into it, and orange segments, and my fingers.
Violet Bakery Chocolate Devil’s Food Cake
Claire smartly notes this is a great “make-ahead” cake. It keeps well for a couple of days. Ideally, you’ll want to bake it the night before you want to fill it, giving the crumb a chance to settle. Similarly, it’s best to fill the cake and then chill it for a couple of hours before icing the tops and sides. Much easier than frosting a warm, crumbly cake. I iced this one all in one go – after it completely cooled, and after cooling overnight. Important! The cake pictured here was baked in two 6-inch x 3-inch pans. Each cake was divided in half, for the four layers. Note / update – The recipe in the book calls for one 8-inch pan, but a few of you had trouble with batter filling over (I suspect Claire uses 3-inch deep pans). I’ve updated the recipe to call for two 8-inch pans. *I used a good, mild olive oil here.
1 1/2 cups plus 1 tablespoon / 200g all-purpose flour
1 cup / 100g cocoa powder
1 teaspoon kosher salt
2 teaspoons baking soda
1 teaspoon baking powder
2 1/4 cups / 450g sugar
2 eggs
1 teaspoon vanilla extract
3/4 cup plus 2 tablespoons / 200g buttermilk or plain yogurt
7 tablespoons / 100g vegetable oil*
1 cup / 225g hot water
Preheat the oven to 320˚F / 160˚C (285˚F / 140˚C convection). Butter and line two 8-inch (20-cm) cake pan with paper, or two 6-inch cake pans (for the four layers you see pictured), or line two 12-cup muffin tins with paper liners.
Measure the dry ingredients, including the sugar, into a large mixing bowl and whisk with a balloon whisk to distribute the salt, baking soda, and baking powder evenly throughout the other the dry ingredients.
In another bowl, whisk together the wet ingredients (except for the hot water). Once they are well whisked together, slowly whisk in the hot water.
Make a well in the center of the dry ingredients and pour half of the wet mixture. Starting in the middle of the bowl, whisk in a clockwise, circular motion. Don’t switch direction or you’ll end up with lumps. Gradually add the remaining wet ingredients until you have a smooth, liquid batter.
If you are making a large cake, pour the batter into your pan(s) right away and bake for 40 to 50 minutes until the top is springy to the touch and an inserted skewer comes out clean. If you are making cupcakes, scrape the batter into a container that will fit into your fridge and put a lid on top. Chill the batter for at least one hour. This will thicken it and make it easier to spoon into your cupcake liners. Bake the cupcakes for 18 to 20 minutes, until the tops are springy to the touch and an inserted skewer comes out clean.
Decorate your cake or cupcakes with the following Marshmallow Icing.
Makes one 8-inch (20 cm) cake or 24 cupcakes, serving 12
Violet Bakery Marshmallow Icing
HS: Claire recommends using a candy thermometer here, I use mine quite often, and it’s worth the minimal investment.
3 egg whites
2 1/4 cups / 450g sugar
1/2 cup / 120g water
1 1/2 tablespoons golden syrup
a pinch of salt
1 1/2 tablespoons vanilla extract
1 vanilla pod, seeds scraped out (optional)
Have your stand mixer with the whisk attachment at the ready.
Measure all of the ingredients into the metal bowl of the stand mixer and place over a pan of boiling water (do not let the water touch the bottom of the bowl or it will cook the egg whites). Whisk continuously until the sugar dissolves and the mixture is very warm to the touch. If using a candy thermometer, whisk continuously for two minutes or until it reads 158˚F to 167˚F (70˚C to 75˚C), whichever comes first. Transfer the bowl to your mixer and whisk on high speed until nearly stiff peaks form.
Put the icing into a piping bag with a large round tip (or use a spoon) and pipe (or spoon) large blobs onto your cooled cake or cupcakes. For this cake I iced between the layers, did a thin crumb layer next, and then used a big offset spatula to ice the sides and top.


